Χειμώνας- Winter
Landscapes - Τοπία
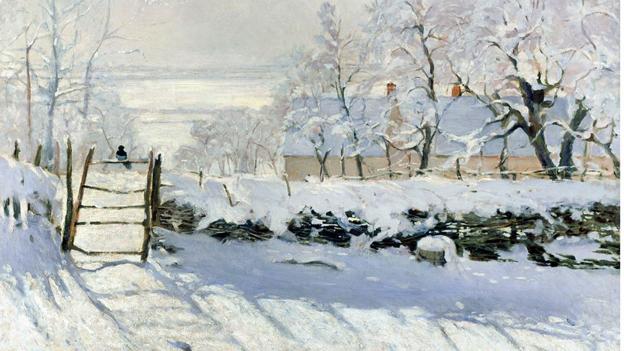
"Η Κίσσα" από τον Κλοντ Μονέ (1868-1869) Ο Monet ήταν αυθεντία στο χειμωνιάτικο σκηνικό - ζωγράφισε πάνω από 100 πίνακες και όταν ο Εντουάρ Μανέ τους είδε, εγκατέλειψε κάθε προσπάθεια να κάνει δικούς του. Αυτός είναι ο μεγαλύτερος πίνακας για τον χειμώνα του Μονέ, που απεικονίζει ένα μαύρο πουλί σε ένα φράχτη στο Etretat - αλλά αυτό που είναι πιο συναρπαστικό στον πίνακα είναι οι σκιές πάνω στο χιόνι, φτιαγμένες όχι με μαύρο χρώμα, αλλά με ένα μπλε πέραν του συμβατικού.
"The Magpie" by Claude Monet (1868-69)
Monet was a master of the winter scene – he painted more than 100 of them, and when Edouard Manet saw the Impressionist’s snowscapes he abandoned any effort to make his own. This is Monet’s largest winter painting, depicting a single black bird on a fence in Etretat – but what’s most thrilling about the work is the shadows on the snow, done not in black but in a convention-shocking blue.
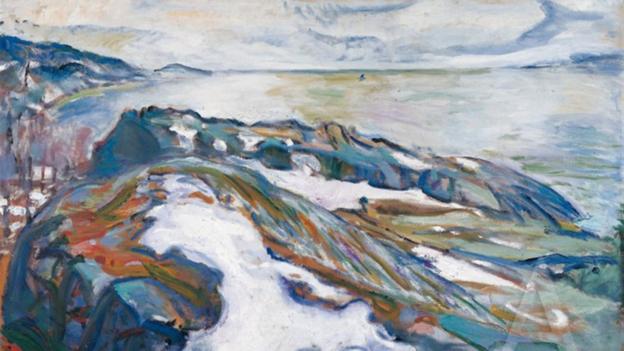
Ζωγραφισμένο στο βάθος του νορβηγικού χειμώνα,το ήρεμο χιονοσμένο τοπίο του Μουνκ κυριαρχείται από λιγότερο άγχος σε σχέση με τις πιο διάσημες φωτογραφίες των βαμπίρ ή των screamers. Ωστόσο, οι απρόσμενα πολύχρωμες κορυφογραμμές των χιονισμένων βουνών - ρυάκια του πράσινου, μπλε και ροζ - δημιουργούν ακόμη και σε αυτό το σχετικά ήσυχο βουητό της εικόνας, συγκίνηση και ενθουσιασμό που χαρακτηρίζουν τα καλύτερα έργα του.
Painted
in the depth of the Norwegian winter, Munch’s placid snowscape is less
angst-ridden than his more famous images of vampires or screamers. Yet
the unexpectedly colourful ridges of the snow-covered mountains –
rivulets of green, blue, and pink – make even this relatively tranquil
image hum with the emotion and excitement that characterise his best
work.
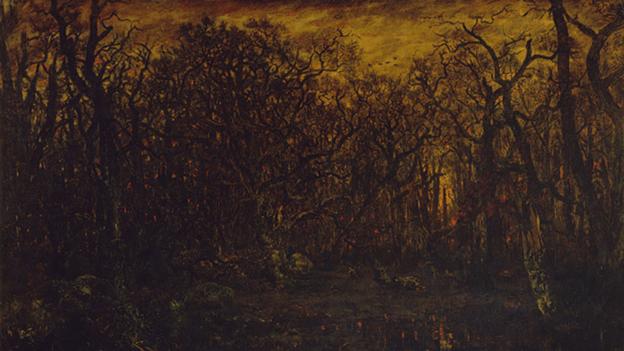
"Το Δάσος το Χειμώνα στο Ηλιοβασίλεμα" από τον Théodore Rousseau (1846-1847)
Μετά από ατελείωτες απορρίψεις στα Σαλόνια του Παρισιού, ο Rousseau έγινε μία από τις ηγετικές φυσιογνωμίες της σχολής Barbizon, μια συλλογή από ζωγράφους από τα μέσα του 19ου αιώνα που απεικόνιζαν το δάσος του Φοντενεμπλό. Εκεί επένδυσε μια τοπιογραφία με μια οικολογική υποχρέωση. Αυτή η μαζική ζωγραφική, ημιτελής στο θάνατό του, αφορά λιγότερο στην ακριβή εμφάνιση των γυμνών βελανιδιών του δάσους από ό, τι με τη θέση μας στη φύση, και τα συναισθήματα που η φύση εμπνέει.
The Forest in Winter at Sunset by Théodore Rousseau (1846–47)
After
endless rejections at the Paris Salon, Rousseau became one of the
leading figures of the Barbizon school, a collection of mid 19th Century
painters who depicted the forest of Fontainebleau. There he invested
landscape painting with an ecological obligation. This massive painting,
unfinished at his death, is less concerned with the exact appearance of
the bare oaks of the forest than with our place in nature, and the
emotions that nature inspires.
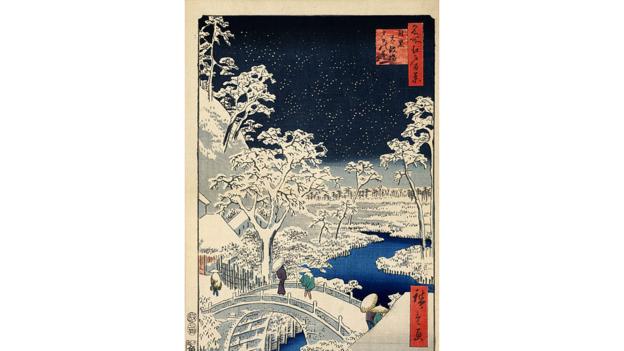
"The Drum Bridge and Yuhi Hill at Meguro" από τον Hiroshige (1857)
Μία από τις εικόνες από τις "Εκατό Θέες" του Έντο, υην πολύ δημοφιλή σειρά των ukiyo-e prints, αυτή η εικόνα απεικονίζει μια σπάνια πέτρινη γέφυρα στην πόλη που τώρα αποκαλούμε Τόκιο. Η λήψη είναι από μια πλάγια γωνία έτσι ώστε η γέφυρα να φαίνεται ότι επισκιάζεται κάτω από τον γεμάτο χιόνι ουρανό, και οι περαστικοί με τα μπαμπού καπέλα, χάνονται στο τοπίο. Οι σκηνές χειμώνα του Χιροσίτζε είναι ίσως οι πιο ευαίσθητες. Κάτω από το χιόνι, ακόμη και η μεγάλη πόλη δίνει την αίσθηση του παροδικού.
-
- The Drum Bridge and Yuhi Hill at Meguro by Hiroshige (1857)
-
- One
of the images from One Hundred Views of Edo, his wildly popular series
of ukiyo-e prints, this image depicts a rare stone bridge in the city we
now call Tokyo. Captured at an oblique angle, the bridge seems dwarfed
under the snow-filled sky, and the passersby, shrouded under bamboo
hats, get lost in the landscape. Hiroshige’s winter scenes are perhaps
his most sensitive; under snow, even the big city feels impermanent.
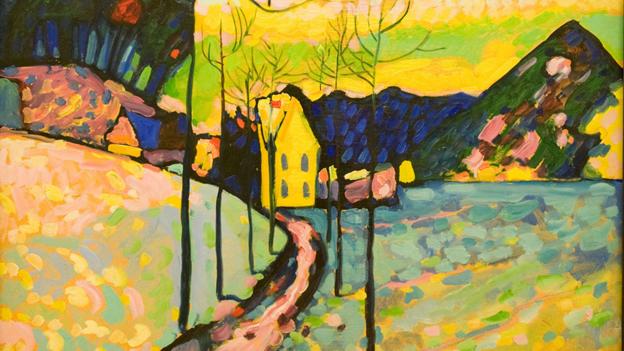
"Χειμωνιάτικο Τοπίο" από τον Wassily Kandinsky (1911)
Νωρίς στην καριέρα ο Kandinsky ανέπτυξε μια θεωρία των χρωμάτων που αποδίδονται συναισθητικές, σχεδόν μυστικιστικές δυνάμεις σε ορισμένους συνδυασμούς αποχρώσεων. Σε αυτή την απεικόνιση του χιονοσμένου τοπίου, μια από τις τελευταίες εικονιστικές συνθέσεις του πριν στραφεί αποκλειστικά στην αφαίρεση, ο κίτρινος ουρανός βουίζει με τις επιδράσεις του πράσινου και του λευκού, η διαδρομή για το μικρό σπίτι στο κέντρο λάμπει ροζ, και η πλαγιά είναι μια εξέγερση αυτοσχέδιων επιχρισμάτων χρώματος .
- "Winter Landscape" by Wassily Kandinsky (1911)
-
- Early in
his career Kandinsky developed a theory of colours that ascribed
synesthetic, nearly mystical powers to certain combinations of tones. In
this depiction of a snow-blanketed country landscape, one of his last
figurative compositions before turning entirely to abstraction, the
yellow sky hums with effects of green and white, the path to the small
house in the centre glows pink, and the hillside is a riot of improvised
coloured daubs.
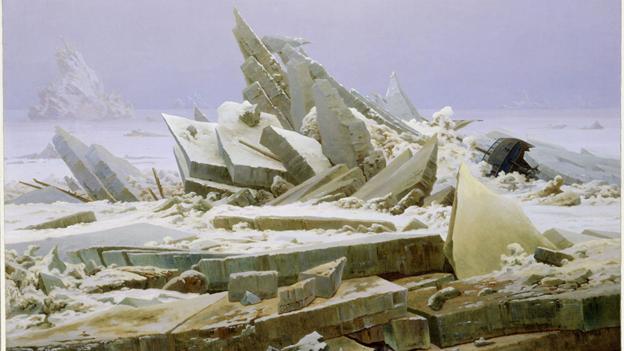
"Η θάλασσα του Πάγου" από τον Caspar David Friedrich (1824)
Ο Γερμανός μεγάλος ρομαντικός ζωγράφος Friedrich, εδώ απεικονίζει το ναυάγιο του HMS Griper, ενός βρετανικού σκάφους σε μια αποστολή στον Βόρειο Πόλο. Το παγόβουνο σμικραίνει εντελώς το πλοίο. Είναι ταφόπλακα και εμπόδιο μαζί. Συχνά στην τέχνη του Friedrich, η φύση εδώ είναι ταυτόχρονα ανυπέρβλητα όμορφη και εντελώς αδιάφορη προς την ανθρώπινη ζωή.
- The Sea of Ice by Caspar David Friedrich (1824)
-
- German
painting’s great romantic, Friedrich here depicts the shipwreck of the
HMS Griper, a British vessel on an expedition to the North Pole. The
iceberg totally dwarfs the ship; it is a gravestone as much as an
obstacle. As so often in Friedrich’s art, nature here is at once
sublimely beautiful and totally indifferent to human life.
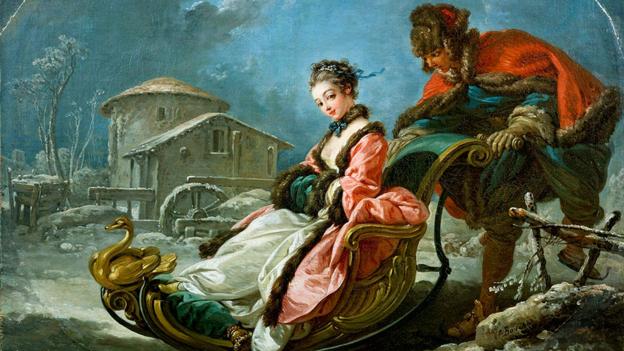
Οι τέσσερις εποχές: Χειμώνας" του Francois Boucher (1755)
Αυτός ο συμβολισμός των κρύων μηνών χαρακτηρίζει το στυλ ροκοκό του 18ου αιώνα: αντί να απεικονίζει τη φύση ή την γεωργική εργασία, ο Boucher μας δίνει ένα δίδυμο που βρίσκεται σε ένα χρυσό έλκηθρο. (Η περιβολή της γυναικείας φιγούρας, παρά τη γούνα, σίγουρα δεν είναι κατάλληλη για τον καιρό). Το έργο έγινε για την Madame de Pompadour, την επίσημη ερωμένη του Λουδοβίκου ΙΕ, και το ακανόνιστο σχήμα του υποδηλώνει ότι πιθανότατα ήταν κρεμασμένο πάνω από μια πόρτα σε μια από τις πολλές κατοικίες της.
- Four Seasons: Winter by Francois Boucher (1755)
-
- This
allegory of the cold months typifies the Rococo style of the 18th
Century: instead of depicting nature or even agricultural labour,
Boucher gives us a flirty duo sliding along in a golden sledge. (The
female figure’s outfit, despite the fur, is definitely not
weather-appropriate.) The painting was executed for Madame de Pompadour,
Louis XV’s official mistress, and its irregular shape suggests that it
probably hung above a door in one of her many residences.
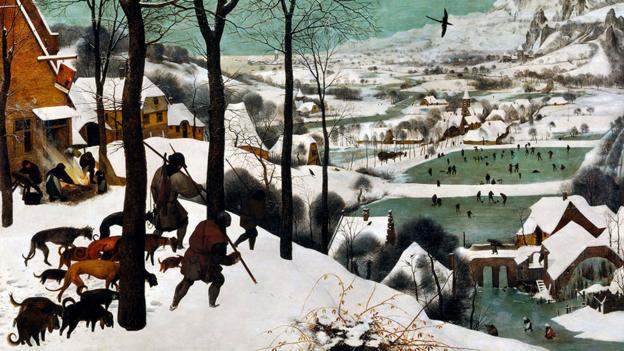
"Κυνηγοί στο Χιόνι" του Pieter Bruegel του Πρεσβυτερου (1565)
Οι χειμωνιάτικες σκηνές, τεχνικά πιο δύσκολες από ό, τι οι καλοκαιρινές, ήταν σχετικά σπάνιες στη δυτική τέχνη, μέχρι την πρώιμη Αναγέννηση. Ένας από τους έξι πίνακες που αντιπροσωπεύουν τις εποχές (αν και μόνο πέντε επιβίωσαν), το πολύ λεπτομερές αριστούργημα του Bruegel σηματοδοτεί μια σημαντική στροφή απότη συμβολική αναπαράσταση των εποχών, την προηγούμενη ευρωπαϊκή παράδοση, σε μια αποκλειστικά κοσμική-πρόσκαιρη σκηνή. Είναι μια ωραία μέρα του χειμώνα, και οι αστοί κάνουν πατινάζ και παίζουν χόκεϊ, αλλά το κυνήγι δεν έχει πάει καλά. Τα κυνηγόσκυλα φαίνονται εξαντλημένα, και οι κυνηγοί έχουν μια μόνο αλεπού μαζί τους.
- Hunters in the Snow by Pieter Bruegel the Elder (1565)
-
- Winter
scenes, technically more challenging than summer ones, were relatively
rare in western art until the early Renaissance. One of six panels
representing the seasons (though only five survive), Bruegel’s vastly
detailed masterpiece marks a major shift from symbolic representation of
the seasons, the previous European tradition, to an exclusively secular
scene. It is a fine winter day, and townsfolk are skating and playing
hockey, but the hunt has not gone well. The hounds look exhausted, and
the hunters have just a single fox among them.

"Χειμωνιάτικη Σκηνή σε ένα Παγωμένο Κανάλι" από Hendrick Avercamp (1620)
Δεν είναι τόσο γνωστός, όπως ο Ρέμπραντ ή ο Vermeer, αλλά κανένας ζωγράφος της ολλανδικής χρυσής εποχής - η οποία αντιστοιχούσε με μία από τις πιο κρύες περιόδους της τελευταίας χιλιετίας - δεν απεικόνιζε τις παγωμένες Κάτω Χώρες με τη συχνότητα και την ευαισθησία του Avercamp. Γεννήθηκε κουφός και μουγκός, έμαθε να κάνει πατινάζ σαν παιδί και έγινε ειδικός σε χειμωνιάτικες σκηνές, τις οποίες οι συλλέκτες αγόραζαν ως έργα ζωγραφικής και χαρακτικής. Όπως και στα περισσότερα χειμερινά τοπία του,σε αυτό κάνει εξαιρετική χρήση της προοπτική ενός σημείου: σε πρώτο πλάνο βλέπουμε μοντέρνους πατινέρ και μασκοφόρους γλεντζέδες σε ιππήλατα έλκηθρα, ενώ άλλοι πατινέρ, κάποιοι έμπειροι και κάποιες λιγότερο, εκτείνονται έξω από τον ορίζοντα.
- "Winter Scene on a Frozen Canal" by Hendrick Avercamp (1620)
-
- He’s
not as famous as Rembrandt or Vermeer, but no painter of the Dutch
Golden Age – which corresponded with one of the coldest periods of the
last millennium – depicted the frozen Low Countries with the frequency
and sensitivity of Avercamp. Born deaf and mute, he learned to skate as a
child and became a specialist in winter scenes, which collectors bought
as paintings and prints. Like most of his winter landscapes, this one
makes brilliant use of one-point perspective: in the foreground we see
fashionable skaters and masked revellers on horse-drawn sleighs, while
other sliders, some adept and some less so, extend out to the horizon.
http://www.bbc.com/culture/story/20131224-the-10-greatest-winter-paintings
Συλλογή με χειμωνιάτικα τοπία στο:
http://www.pinterest.com/stampingstiles/art-i-like-winter-landscapes/
Μια ιστορία για τον Henri Matisse
Ο Henri Matisse γεννήθηκε στη Γαλλία το
1869. Ο πατέρας του πουλούσε σπόρους και σιτηρά και η μητέρα του ήταν μοδίστρα. Στην ηλικία των 20 ο Henri σπούδαζε για να γίνει δικηγόρος όταν αρρώστησε βαριά. Έπρεπε να υποβληθεί σε χειρουργική επέμβαση και ήταν κλινήρης. Ο Henri βαριόταν και έτσι η μητέρα του του
έδωσε ένα κουτί με μπογιές και πινέλα για να έχει κάτι να κάνει. Όταν ανάρρωσε δεν ήθελε να πάει πίσω στο σχολείο, και αντί γι' αυτό πήγε κατ 'ευθείαν στη σχολή καλών τεχνών!Ο Matisse
ήταν τόσο καλός στη ζωγραφική που η σχολή δεν τον βοήθησε και έτσι
αποφάσισε να ανοίξει τη δικό του σχολή και να δείξει σε άλλους
καλλιτέχνες πώς να ζωγραφίζουν. Οι κριτικοί της
τέχνης έλεγαν ότι ο Henri και οι φίλοι του ζωγράφιζαν σαν "'Αγριοι - Fauves" επειδή χρησιμοποιούσαν σαν
τολμηρά φωτεινά και ασυνήθιστα χρώματα. Οι επικριτές του θεωρούσαν ότι οι "φωβιστές" ποτέ δεν θα ήταν επιτυχείς καλλιτέχνες, αλλά έκαναν λάθος. Ο Henri
Matisse εργάστηκε για την τέχνη του για πάνω από 60 χρόνια και έγινε
ένας από τους μεγαλύτερους καλλιτέχνες όλων των εποχών! Καθ 'όλη τη διάρκεια της ζωής του, ο ίδιος υπέφερε από κακή υγεία, όμως ποτέ δεν τον σταμάτησε να δημιουργεί τέχνη! Πολλές
εικόνες φιλοτεχνήθηκαν από το κρεβάτι της ασθενείας του και
δείχνουν το εσωτερικό του δωματίου του, καθώς και την άποψη των
εξωτερικών χώρων μέσα από ένα ανοιχτό παράθυρο, τα δωμάτια είχαν
διαμορφωμένη ταπετσαρία, κουρτίνες, τραπεζομάντιλα και πολλά
αντικείμενα καθημερινής χρήσης, υπήρχαν τόσο πολλά να δούμε στις εικόνες του Matisse! Συνήθιζε να χρησιμοποιεί πλούσια χρώματα και σχήματα και αγαπούσε να ζωγραφίζει τους ανθρώπους πάρα πολύ. Ο Henri
ήταν επίσης γνωστός για τη δοκιμή ενός νέου στυλ, ζωγράφιζε σε
χαρτί και στη συνέχεια το έκοβε και το επικολλούσε στον πίνακα του.Ο Matisse ήταν παντρεμένος και είχε τρία παιδιά. Αγαπούσε
να ταξιδεύει και να εξερευνά άλλες χώρες και συχνά επηρεαζόυαν από αυτούς τους πολιτισμούς και τη λαϊκή τέχνη τους. Πέθανε το 1954 ήταν 85!Ο Henri
Matisse είναι ένας από τους πολύ αγαπημένους μου καλλιτέχνες, που μας έχει
δώσει νέες πολύχρωμες, δημιουργικές ιδέες για να χρησιμοποιήσουμε στο δικό
μας κλάδο, και οι πίνακές του βρίσκονται σε μουσεία σε όλο τον κόσμο!
A Story About Henri Matisse
A story about Henri Matisse by Eileen Urbanski, Art Teacher at Avon Village School - Avon,OH
Henri Matisse was born in France in 1869. His father sold seeds and
grain and his mother was a dressmaker. At the age of 20 Henri was
studying to be a lawyer when he became very ill. He had to have surgery
and was bedridden. Henri was very bored just lying around so his mother
gave him a box of paints and brushes so he would have something to do.
When he recovered he did not want to go back to law school, instead he
went straight to art school!
Matisse was so good at painting that the school didn't help him so he
decided to open his own school and show other artists how he painted.
Art critics thought Henri and his friends painted like "Fauves" (a
French work for wild beasts) because they used bold bright and unusual
colors. Critics thought the "Fauvists" would never be successful
artists, but they were wrong. Henri Matisse worked on his art for over
60 years and became one of the greatest artists of all time! Throughout
his lifetime, he suffered from poor health, but that never stopped him
from creating art! Many pictures were painted from his sick bed so they
show the inside of his room and a view of the outdoors through an open
window, the rooms had patterned wallpaper, curtains, tablecloths and
many everyday objects, there was so much to look at in Matisse's
pictures! He used rich colors and shapes and loved to paint people too.
Henri was also known for trying a new style by painting paper and then
cutting it out and pasting it into the painting.
Matisse was married and had three children. He loved to travel and
explore other countries and often was influenced by those cultures and
their folk art. He died in 1954 he was 85!
Henri Matisse is one of my very favorite artists, he has given us new
and colorful, creative ideas to use in our own art, and his paintings
are treasured in museums all over the world!
http://www.kinderart.com/arthistory/meetmatisse.shtml
Paper Cuts Outs (gouaches découpés)
Technique of the Cut Outs
With the aid of his assistants, Matisse invented a
systematic approach to the technique of his cut outs.. First, his studio
assistants brushed Linel gouaches on sheets of white paper.
Once dry a stockpile of colored paper were available to
Matisse at any given time. He often quite spontaneously cut out elements
and placed them into compositions. As the play between consciously
sought-for and the fortuitously-arrived at effects worked into their
balances the projects moved toward completion. In the meantime many of
them were posted about the studio walls.
The Linel gouaches were employed because they "directly
corresponded to commercial printers ink colors" (Cowart 17) and would
reproduce perfectly. The cut-outs pulsate with energy. The bright,
vibrant Linel colors, deep and Light Japanese Green, vert Emeraude
(Imitation veridian), Deep Cadmium Yellow, Deep Cadmium Red, Deep
Persian Red, Persian Violet, and Yellow Ochre (Cowart 274), keep leaping
in front of our eyes.
 La Gerbe
, one of Matisse's latest works (1953).
In 1941 Matisse was diagnosed with cancer and, following
surgery, he started using a wheelchair. Before undergoing a risky
operation in Lyon, he wrote an anxious letter to his son, Pierre,
insisting, "I love my family, truly, dearly and profoundly." He left
another letter, to be delivered in the event of his death, making peace
with Amélie.
However, Matisse's extraordinary creativity was not be
dampened for long. “Une seconde vie”, a second life, was what he called
the last fourteen years of his life. Following an operation he found
renewed and unexpected energies and the beautiful Russian-born
assistant, Lydia Delectorskaya, to keep him company. Vast in scale
(though not always in size), lush and rigorous in color, his cutouts
are among the most admired and influential works of Matisse's entire
career. They belong with the grandest affirmations of the élan vital
in Western art.

Cut outs of the
Negress temporarily
positioned on the wall of Matisse's
studio.
This new lease of life led to an extraordinary burst of
expression, the culmination of half a century of work, but also to a
radical renewal that made it possible for him to create what he had
always struggled for: “I have needed all that time to reach the stage
where I can say what I want to say.” With the aid of Lydia
Delectorskaya and assistants he set about creating cut paper collages,
often on a enormous scale, called gouaches découpés. By maneuvering scissors through prepared sheets of paper, he inaugurated a new phase of his career.
Matisse was hardly new to cutting. It was already present
to him as a descendent of generations of weavers, who was raised among
weavers in Bohain-en-Vermandois, which in the 1880's and 90's was a
center of production of fancy silks for the Parisian fashion houses.
Like virtually all his northern compatriots, he had an inborn
appreciation of their texture and design. He knew how to use pins and
paper patterns, and he was supremely confident with scissors.
The cut out was not an renunciation of painting and
sculpture: he called it “painting with scissors.” Matisse said, "Only
what I created after the illness constitutes my real self: free,
liberated.” Moreover, experimentation with cut-outs offered Matisse
innumerable opportunities to fashion a new, aesthetically pleasing
environment: "You see as I am obliged to remain often in bed because of
the state of my health, I have made a little garden all around me
where I can walk... There are leaves, fruits, a bird."

Cut outs for the window Chapelle
du Rosaire in Vence
In 1947 he published
Jazz, a limited-edition book
containing prints of colorful paper cut collages, accompanied by his
written thoughts. In the 1940s he also worked as a graphic artist and
produced
black-and-white illustrations for several books.
Matisse also employed cut outs that he designed for the
stained-glass windows for the Chapelle du Rosaire, a project he took on
as a gesture to a young woman who had nursed him in Lyon in 1941 and
later became a Dominican nun. The small modern building on the grounds
of the Dominican nuns' residence in Vence took almost four years to
complete. It was, Matisse said, the production of "an entire life of
work."
La Gerbe (above), multicolored leaves that resemble a
spray of flowers, was completed a few months before his death, but it
explodes with life. The artist who almost reinvented color in painting
had by now found freedom in the simplicity of decoration. "I have the
mastery of it," he told
André Rouveyre in a letter. "I am sure of it."
Jazz and the Technique of the Cut Outs
"My curves are not crazy." - Henri Matisse, Jazz, 1947

The cover of
Jazz (1947)
Among his first adventures with paper cutouts was a cheerful book called Jazz,
which Matisse prepared during the war but which was only published in
1947. The book and the concurrently published album with the twenty
color plates was only printed in a hundred copies. The lively multicolor
forms, both abstract and figurative, seem to echo the voice of a man
stubbornly refusing to be cowed by the times. But he was also enchanted
by the technique. "The walls of my bedroom are covered with cutouts,"
he wrote to André Rouveyre in 1948. "I still don't know what I'll do
with them."

A signed copy of Verve
edited by Tériade
Jazz was published by Efstratios Tériade with whom Matisse had previously collaborated on several other
printed projects involving art and text. Tériade's artful magazine Verve
(see left) had already featured, as cover illustrations, examples of
Matisse's cutout work. No serious artist had ever taken collage to this
extreme of simplicity and description, and there were those who
ridiculed him for it. Nonetheless, Jazz was a natural outgrowth
of the increasing limitations of Matisse's physical agility and the
abundance of his creative spirit at this time.
Matisse viewed jazz as a "chromatic and rhythmic improvisation." The title Jazz
evoked for Matisse the idea of a structure of rhythm and repetition
broken by the unexpected action of improvisations. The artist wrote to a
friend in late 1947, "There are wonderful things in real jazz, the
talent for improvisation, the liveliness, the being at one with the
audience."

Lydia Delectorskaya
Matisse designed the book so that each full-page image is
preceded by five pages of text and each half-page image by three pages
of text. As part of the Jazz text Matisse writes of this
format, "I'd like to introduce my color prints under the most favorable
of conditions. For this reason I must separate them by intervals of a
different character. I decided that handwriting was best suited for this
purpose. The exceptional size of the writing seems necessary to me in
order to be in a decorative relationship with the character of the color
prints. These pages, therefore will serve only to accompany my colors,
just as asters help in the composition of a bouquet of more important
flowers. Their role is purely visual."
Tεχνική των cut outs
Ο Matisse γενικά έκοβε σχήματα
ελεύθερα, χρησιμοποιώντας ένα μικρό ψαλίδι και φύλαγε και τα κομμένα κομμάτια
και τα υπολείματα. Με
τη βοήθεια της Lydia Delectorskaya οργάνωνε και έκανε αναδιάταξη των
χρωματιστών cut outs μέχρι που ήταν απόλυτα ικανοποιημένοι με τα αποτελέσματα. Χρειάστηκαν
δύο χρόνια για να ολοκληρώσει είκοσι κολάζ και μετά από χρόνια, μέσα από τη
δοκιμή και το λάθος, συμφωνήθηκε μια πρακτική και κατάλληλη μέθοδος ώστε να
έρθουν τα κολάζ στη ζωή ως δισδιάστατα έργα.
Αφού
έκοβε τα σχήματα, στο δεύτερο μέρος της δημιουργικής διαδικασίας κάρφωνε τα
κομμένα κομμάτια χαρτιού στους τοίχους του εργαστηρίου του, δημιουργώντας ένα
παραδεισένιο κήπο με οργανικά σχήματα που έμοιαζαν με φύκια, φύλλα, φύκια και
κοράλλια,
σχήματα που θύμιζαν τα πρότυπα που εμφανίζονται σε πολλά από τα πρώτα έργα του
Ματίς. Όταν
έβρισκε την επιθυμητή ισορροπία της μορφής και του χρώματος, η τελική σύνθεση
ήταν κολλημένη σε χαρτί, μουσαμά ή πίνακα.
Ο
Matisse ήταν σαφώς ευαίσθητος στon ιδιαίτερα φυσικό χαρακτήρα των έργων αυτών:
ενώ ήταν σε εξέλιξη τα άφηνε ελαφρά καρφιστωμένα στον τοίχο όπου θα έτρεμαν στο
παραμικρό αεράκι. Με
αυτή την ανάρτηση των εικόνων στον τοίχο άρχιζε τη δεύτερη από τις δύο
διαδικασίες που παρήγαγε τα cut outs: η διακοσμητική οργάνωση των προσχηματισμένων
σημείων. Αυτή
ήταν μακράν η μεγαλύτερη και πιο διαβουλευτική διαδικασία από την πρώτη.
Διαρκούσε μερικές φορές πολλούς μήνες, ακόμη και από το ένα έτος στο επόμενο
για μεγαλύτερα έργα. Ο Matisse
άλλαζε τη θέση των εικόνων, πρόσθετε νέες, κατά καιρούς τροποποιούσε τις
υφιστάμενες, έως ότου επιτευχθεί η επιθυμητή διαμόρφωση. Μέχρι
το τέλος της δεκαετίας του 1940, ο Matisse έκανε χρήση των "cut - outs
" για διάφορα έργα διακοσμητικών τεχνών, συμπεριλαμβανομένων τοίχων,
σχεδίων κασκόλ, ταπετσαριών, χαλιών, και σχέδια για το Δομινικανικό εκκλησάκι
στη Vence.
Cut outs Technique by Matisse
Matisse generally cut the shapes out freehand, using a small
pair of scissors and saving both the item cut out and remaining scraps
of paper. With the help of Lydia Delectorskaya he would arrange and
rearrange the colored cutouts until he was completely satisfied that the
results. It took two years to complete the twenty collages and, after
years of trial and error, a practical and appropriate method was agreed
upon for bringing the collages to life as two-dimensional works.
After having cut of the shapes, the second part of the
creative process entailed pinning the cut pieces of paper to the walls
of his studio, which created a paradisical, garden-like world of organic
shapes that resembled algae, leaves, seaweed, and coral, shapes
recalling patterns that appeared in many of Matisse's earliest works,
which floated atop brilliantly colored grounds. When the desired balance
of form and color was achieved, the finished composition was glued to
some type of support such as paper, canvas, or board.
Matisse was clearly sensitive to the particularly physical
nature of these works: while they were in progress he would leave them
lightly pinned to the wall where they would tremble in the slightest
breeze. This pinning of images to the wall began the second of the two
processes that produced the cut-outs: the decorative organization of the
preformed signs. This was by far a longer and more deliberative process
than the first one; it sometimes lasted several months, and even from
one year to the next for larger works. Matisse would change the position
of the images, adding new ones, at times modifying existing ones, until
the desired configuration was reached. By the end of the 1940s,
Matisse was using "cut-outs" for various decorative arts projects,
including wall hangings, scarf patterns, tapestries, rugs, and the
designs for the Dominican chapel at Vence.
From the beginning, Tériade collaborated closely on Jazz.
Initially Matisse had used the Linel brand of gouache paint because of
its brilliance and depth of pigment. He was also advised that Linel
paints in particular could be keyed to corresponding colors of printing
inks. Tériade suggested to Matisse to "use all the gouache colors that
you can imagine, and that Madame Lydia can prepare for you. I guarantee
that we will obtain in the print, the exact color. From the moment that
the print is in the plates, there will be nothing to fear, one will
always be able to find the exact color, especially when the printing of
each color is different." By directly brushing the Linel gouache through
hand-cut stencils Tériade's printers were able to give the Jazz
stencils a directness and richness similar to what the artist had
achieved in his collaged maquettes. The stencils were cut by hand from
thin sheets of metal, probably brass or copper.
http://www.henri-matisse.net/cut_outs.html
ΔΡΑΣΤΗΡΙΟΤΗΤΕΣ ΓΙΑ ΤΟ ΝΗΠΙΑΓΩΓΕΙΟ
Οι μικροί μαθητές μαθαίνουν για τον Matisse:
Υλικά
χαρτί (12 "x 18")
μολύβια
χαρτί μέτρου
τέμπερα χρώμα
κόλλα
βιογραφία του Matisse
Τι να
κάνετε: μπορείτε να πάτε σε μια
υπέροχη περιπέτεια στη Γαλλία και
να συναντηθείτε με τον Matisse, να μάθετε για το πώς άρχισε να ενδιαφέρεται για την τέχνη και γιατί έφτιαχνε σχέδια και ενδιαφέροντα
σχήματα!
Μπορείτε να δείξετε πίνακες του Matisse και να διαβάσετε μια ιστορία για τον Matisse.
Εξοικειώστε τα παιδιά με
διάφορα σχήματα, αφήστε τα να σχεδιάσουν το
περίγραμμα από τα χέρια τους ξανά και ξανά σε ένα φύλλο χαρτί 12x18
και να γεμίσουν κάθε χέρι με
ένα πολύχρωμο και ενδιαφέρον σχέδιο.
Στη συνέχεια, ο
κάθε μαθητής μπορεί να επιλέξει 3
φωτεινά χρώματα
χαρτί, να σχεδιάσει το περίγραμμα των
χεριών του και να το κόψει.
Μαζί με τα παιδιά καρφιτσώστε τα cut outs των
χεριών τους ελαφρά στον τοίχο ή σε χαρτί μέτρου (όπως έκανε ο Matsisse) δημιουργώντας ένα κήπο από
"χέρια". Αποφασίστε ποιά από αυτά θα χρησιμοποιήσετε, ανάλογα με το
χρώμα και την μορφή (αυτή η διαδικασία μπορεί νε διαρκέσει πολλές ημέρες) και στη συνέχεια μποροείτε να δημιουργήσσετε
ένα "θετικό" σχέδιο και ένα
"αρνητικό". Στο τέλος, μπορούν τα παιδιά να ζωγραφίσουν όπως οι
Fauves!(Δείτε τις φωτό πιο κάτω).
Για τον χειμώνα:
παρουσιάζουμε τον πίνακα του Matisse, "Ο Εσκιμώος".
Με την ίδια τεχνική ενθαρρύνουμε τα παιδιά να φτιάξουν ένα εσκιμώο ή χειμωνιάτικο τοπίο.
The Eskimo, 1947, Henri Matisse
http://www.henri-matisse.net/cutouts/hb.html
PRE SCHOOL ACTIVITIES
Objectives:
Students will learn all about Matisse.
What You Need:
- manilla paper (12" x 18")
- pencils
- construction paper
- tempera paint
- glue
- Matisse biography
What You Do:
I went on a wonderful adventure with my 2nd graders, we went to France
and met Matisse! Well not really, but we learned about how he became
interested in art and why he drew busy designs and interesting shapes!
In the first lesson, examples of Matisse's work were shown, a story was
read, then a homework assignment was given! (see Matisse story below).
The next lesson had the students explore the use of shapes, they traced
their hands over and over again on a sheet of 12x18 manila paper,
overlapping and even running them off the page. They used markers to
fill each hand in with an colorful and interesting design.
With our final exploration, each student was allowed to choose 3 colors
of bright paper, they traced their hands again and cut them out. Next
they created a positive shape design:
and a negative shape design:
we then moved right into painting like the Fauves!
At the end of this unit the students compiled a small booklet with
vocabulary words and coloring pages of Matisse's still life sketches to
take home!
ΑΛΛΕΣ ΤΕΧΝΙΚΕΣ ΣΤΟ ΝΗΠΙΑΓΩΓΕΙΟ
Τεχνικές Ιμπρεσιονισμού Ο Iμπρεσιονισμός ζωγραφικά χαρακτηρίζεται από τις παρακάτω βασικές τεχνικές:
*Μικρές
και συχνά εμφανείς πινελιές που δημιουργούν χαρακτηριστικά παχύ στρώμα
μπογιάς στον καμβά. Μ' αυτό το τρόπο δε μπορούν ν' αποτυπωθούν πολλές
λεπτομέρειες του θέματος αλλά γενικά χαρακτηριστικά του.
*Χρήση
κυρίως των βασικών χρωμάτων, με μικρή ανάμιξη μεταξύ τους (η διαδικασία
της ανάμειξης αυτής γίνεται από τον ίδιο τον θεατή του έργου).
*Σπάνια
χρήση του μαύρου χρώματος, μόνο στις περιπτώσεις που αποτελεί μέρος του
θέματος. Δε χρησιμοποιούσαν το μαύρο χρώμα προκειμένου να επιτύχουν
σκιάσεις ούτε το αναμίγνυαν με τα βασικά χρώματα.
*Απουσία διαδοχικών επιστρώσεων χρώματος. Ζωγράφιζαν πιο γρήγορα, χωρίς να περιμένουν απαραίτητα το χρώμα να στεγνώσει.
*Έμφαση στο τρόπο που το φως ανακλάται πάνω στα αντικείμενα, αποτύπωση του θέματος μ' ένα είδος επιστημονικού ενδιαφέροντος.
*Ζωγραφική κυρίως σ' ανοιχτούς χώρους, συνήθως με φωτεινά κι έντονα χρώματα.
Θα
πρέπει να τονίσουμε πως οι τεχνικές αυτές συναντώνται και σε
προγενέστερους ζωγράφους, όμως οι Ιμπρεσιονιστές τις χρησιμοποίησαν
συστηματικά. Αξίζει ακόμα να σημειωθεί πως ευνοήθηκαν κι από την
ανακάλυψη των προ-επεξεργασμένων χρωμάτων (παρόμοια μ' αυτά που
χρησιμοποιούνται και σήμερα), γεγονός που εκμεταλλεύτηκαν για να
ζωγραφίζουν σ' ανοιχτούς χώρους. Παλαιότερα κάθε ζωγράφος ήταν
αναγκασμένος να δημιουργήσει ο ίδιος τα χρώματα αναμιγνύοντας τα διάφορα
υλικά.
Ασαμπλάζ: (Ερνστ)
Ο Ερνστ υπήρξε και γλύπτης, όχι με τη καθιερωμένη, αλλά με τούτη τη
τεχνική. Δηλαδή συνέθεσε γλυπτά "νταντά" και σουρεαλιστικά, μα με
χρησιμοποίηση μεταχειρισμένων αντικειμένων πιότερο, παρά με άμεση
παρέμβαση διαμορφώνοντας και λαξεύοντας το υλικό του.
Κολάζ:
Η πλέον δυναμική συμβολή του Ερνστ στη προσπάθεια των ντανταϊστών να
πλήξουνε τις παραδοσιακές καλλιτεχνικές αξίες. Με τη τεχνική αυτή,
κατάφερε να επεξεργαστεί οικείες εικόνες και να δημιουργήσει παράξενες
αινιγματικές συνθέσεις που προκαλούνε κι αποσυντονίζουνε τη λογική. Η
αρχική του ώθηση σε τούτο, όπως εξηγεί ο ίδιος, προήλθεν από την
επιθυμία του να δημιουργήσει διδακτικό κατάλογο, με τόσον ετερόκλητα
στοιχεία, ώστε να μπερδέψουνε το μυαλό, να παράγουνε παραισθήσεις και να
προσδώσουνε στ' αντικείμενα της εικόνας, νέες συστάσεις μέσα από τη
γοργή εναλλαγή. Το πιο σημαντικό τελικά ήτανε η ποιητική σπίθα που
προέκυψε από το συνδυασμό ετερογενών στοιχείων, παρά το ίδιο το κολάζ.
Φροτάζ:
Η εμμονή του Ερνστ με το υποσυνείδητο, εισήγαγε στο σούρεαλ ιδίωμα τη
τεχνική του φροτάζ. Προέκυψε κάποια στιγμή, που παρατηρούσε τις
φθαρμένες γραμμές των ξύλινων σανίδων ενός δαπέδου, σ' ένα μικρό
ξενοδοχείο στο Πορνάν της Γαλλίας, στις όχθες του Ατλαντικού, τον
Αύγουστο του 1925. "Όπως βλέπουνε στα οράματά τους οι υπνοβάτες", οι
γραμμές δημιουργούσαν εικόνες π' αλλάζανε, συνεχώς μεταβάλλονταν και με
στόχο να οδηγήσει σ' οξεία μορφή τα στοιχεία του διαλογισμού και της
παραίσθησης, άντλησεν από το πάτωμα μια σειρά εικόνων. 'Απλωσε χαρτί
πάνω στο δάπεδο και πέρασε την επιφάνειά του με μαλακό μολύβι,
διαδικασία που επανέλαβε και σ' άλλες επιφάνειες, από φύλλα, χαρτί
συσκευασίας και μεταλλικά πλέγματα. Στο ανάγλυφο που δημιουργήθηκε,
συνέθεσε νέες ποιητικές εικόνες, πιο ελεύθερες παραλλαγές της τεχνικής
του κολάζ. Το 1926 συγκέντρωσε κι εξέδοσε 34 φροτάζ με τίτλο "Φυσική
Ιστορία" που σαφώς αναφερότανε στο φυσικό κόσμο.
Γκρατάζ:
Αναζητώντας νέες αυτόματες τεχνικές, βασισμένες σ' έμμεσες μεθόδους
χειραγώγησης του υλικού, υιοθέτησε τη τεχνική του φροτάζ και στην
ελαιογραφία και τη βάφτισε γκρατάζ. Τοποθετούσε τον καμβά πάνω σε ξύλινα
αντικείμενα, -χτένι, μυστρί, επεξεργασμένο γυαλί- κι ύστερα μ' ένα
φτυαράκι, άπλωνε το χρώμα, δουλεύοντας με την ίδια τεχνική και
δημιουργικήν ελευθερία που του προσέφερε και το φροτάζ. Πρόκειται για
πιο αφηρημένα έργα, μεγάλων διαστάσεων, που ωστόσο διαθέτουν εντονότερη
δραματικότητα και ξεχωριστήν ατμόσφαιρα, που κυριαρχεί κλίμα βίας κι
εχθρότητας.
Ντεκαλκομανί:
Χάρη σ' αυτή τη τεχνική, με το μελάνι να ρέει ανάμεσα σε δυο φύλλα
χαρτί, σχεδίαζε πάνω στη ζωγραφικήν επιφάνεια, υποβλητικές γραμμές. Οι
σούρεαλ ποιητές, είχανε δοκιμάσει τη τεχνική κατά το 2ο μισό της 10ετίας
του '30, αλλά εκείνος την εφάρμοσε στην ελαιογραφία, όπως και στο
γκρατάζ. Ζωγράφισε πάνω στην αυτόματην επιφάνεια, αν και κάποιες φορές
χρησιμοποίησεν ένα λεπτομερές ιλουζιονιστικό στυλ. Σε μερικούς πίνακες,
οι δυο αυτές τεχνικές ερχόντανε σε πλήρη αντίθεση μεταξύ τους, ενώ σ'
άλλους, εμφανιζόντανε πλήρως εναρμονισμένες και δύσκολα διαχωριζότανε
που τέλειωνε η μια κι άρχιζεν η άλλη.
Παπιέ-Κολλέ:
(Μπρακ, Πικάσο, Γκρις): Τεχνική του κολάζ που εισάγει στους πίνακες
κομάτια από εφημερίδες, διακοσμητικά χαρτιά, χαρακτικά, υφάσματα ή
καναβόπανο συχνά κερωμένο. Ουσιαστικά δε χρωματίζανε κάποιο τμήμα του
πίνακα, αλλ' αντικαθιστούσανε το χρώμα μ' όλ' αυτά τα ήδη έτοιμα
στοιχεία.
Ντρίπινγκ:
(τεχνική του σταξίματος: Πόλλοκ): Από το 1947 ο καλλιτέχνης εγκατέλειψε
τη τεχνική της εφαρμογής του χρώματος στο καμβά με πινέλο κι άρχισε να
στάζει το βερνίκι απευθείας από το δοχείο. Επίσης δοκίμασε να βουτήξει
το πινέλο ή μια βέργα στο χρώμα και να πιτσιλίσει μ' αυτό τον πίνακα.
Από τη προσπάθεια τούτη, προέκυψεν ο όρος ντρίπινγκ. Κι άλλοι ζωγράφοι,
μεταξύ των οποίων οι Σουρεαλιστές Αντρέ Μανσόν και Μάξ Ερνστ, είχανε
χρησιμοποιήσει την ίδια τεχνική για να προσδώσουνε τόνον αυθορμητισμού
στα έργα τους, μα κανείς δεν είχε σκεφτεί και τολμήσει να ζωγραφίσει
έναν ολόκληρο πίνακα μ' αυτό το τρόπο. Τ' αποτελέσματα ήταν εντυπωσιακά
και κορυφωθήκανε σε μια σειρά αριστουργήματα που φιλοτεχνηθήκανε μ' αυτή
τη τεχνική και μάλιστα σε σύντομο χρονικό διάστημα. Αντιπροσωπευτικές
δημιουργίες που του χαρίσανε μια θέση στην αιωνιότητα.
Papier-Decoupes: (Mατίς):
Πρώτα συνδύαζε κατάλληλα τα χρώματα, ώστε να πετύχει τη κατάλληλη κι
επιθυμητή απόχρωση, με μεγάλην επικαλυπτικήν ικανότητα (Γκουάς). Έπειτα
γέμιζε μ' αυτά ολάκερα φύλλα χαρτιού, -κάθενα ξεχωριστό φύλλο κι ένα
ξεχωριστό χρώμα- κι ύστερα με το ψαλίδι στο χέρι, έκοβε κατάλληλα τα
φύλλα, ώστε να σχηματίσει το σχέδιο. Παράδειγμα Παπιέ-Ντεκουπέ, είν' ο
πίνακας "Το Μπλέ Γυμνό", που υπάρχει στο Στέκι, σ' όλες του τις φάσεις.
Μποδεγκόν:
(Βελάσκεθ): Στα ισπανικά σημαίνει: λαϊκή ταβέρνα, αλλά στη συνέχεια,
άρχισε να χρησιμοποιείται για πίνακες που απεικονίζανε σκηνές από τη ζωή
των απλών ανθρώπων και που υπήρχεν επίσης και φαγοπότι, καθώς επίσης
και νεκρές φύσεις με φαγητό, ποτό και φρούτα. 'Αλλες εικόνες από
ταβέρνες, από πανδοχεία, από κουζίνες ή τραπεζαρίες ή κι από χώρους που
δε προσδιορίζονταν με σαφήνεια. Κατά τη νεανική του φάση, ο Βελάσκεθ
(1617-'23), ζωγράφισε πολλά τέτοια κι έχουνε διασωθεί καμμιά δεκαριά.
Θεωρούνταν ελάσσον είδος τέχνης, μα κείνος κατάφερε να του προσδώσει
πλούτο και βάθος, στοχαστικότητα κι απέδειξεν έτσι την ικανότητά του στη
Νατουραλιστικήν απόδοση, αναδεικνύοντας με μοναδική τέχνη, αυτή τη
"ζωγραφική των φτωχών"!
Από τα καλύτερά του, είναι "Ο Νερουλάς" κι η "Μαυριτανή Παραμαγείρισσα" -στο Στέκι υπάρχει το, "Η Γρια-Μαγείρισσα"
κι είναι από τα πιο εκφραστικά του-, τόσο μάλιστα, ώστε το πρώτο, το
'χε μαζί του πάντα, σαν κάρτα επισκεπτηρίου, για να δείχνει διαπίστευση,
περί του ποιος και τι καλλιτέχνης είναι, μιας κι αναδεικνύει ολο το
εύρος της δεξιοτεχνίας του.
Νωπογραφία:
(πολλοί με κύριοτερο εκπρόσωπο τον Φρα Αντζέλικο): Η διαδικασία είν' η
εξής: Ο καλλιτέχνης προετοιμάζει τον τοίχο με μια στρώση ακατέργαστου
αμμοκονιάματος (σοβά), που περιέχει ασβέστη, άμμο και νερό. Ύστερα
μπαίνει το "αρίτσιο", κονίαμα με τρία μέρη άμμου κι ένα ασβέστη. Πάνω
κει φιλοτεχνείται το προσχέδιο της σύνθεσης με σινωπική, χρωστική ουσία
με βάση το κοκκινόχωμα, που τότε εισαγόταν από τη Σινώπη. Κατόπιν ο
καλλιτέχνης, διαμόρφωνε το τελικό λεπτό και λείο στρώμα κονιάματος, από
άμμο ή μαρμαρόσκονη κι ασβέστη σε ίσα μέρη που ονομαζόταν "ιντονάκο".
Το
χρώμα διαλυμένο με νερό, εφαρμοζότανε πάνω στο τελευταίο αυτό στρώμα,
ενώ το κονίαμα ήταν ακόμα νωπό (εξ ου κι η ονομασία: νωπογραφία), έτσι
ώστε να στερεοποιηθεί πάνω στον τοίχο, όσον αυτός στέγνωνε. Επειδή το
χρώμα κι το κονίαμα στεγνώνανε γρήγορα, δεν υπήρχε περιθώριο και
δυνατότητα διόρθωσης των λαθών. Ως εκ τούτου, ο καλλιτέχνης έπρεπε να
'χει σταθερό χέρι και την ικανότητα να εργαστεί με μεγάλη ταχύτητα.
Εύλογα προτιμόταν ο καλοκαιρινός ξηρός καιρός.
Σφουμάτο: ή sfumato (Ντα Βίντσι): Επιδιδόταν
σε πειράματα με τις μπογιές και τα βερνίκια της εποχής. Στο πλαίσιο
αυτών των μελετών, επινόησε τη μέθοδο αυτή, απλώνοντας διαδοχικές
στρώσεις από ημιδιαφανές βερνίκι και δημιουργώντας έτσι έν' ευρύ φάσμα
από σκιάσεις, απάλυνε μέχρι και διαλύσεως το περίγραμμα των μορφών,
δημιουργώντας αινιγματικές σκιές γύρω από τις γωνίες των ματιών και του
στόματος, του προσώπου που ζωγράφιζε. Αυτό είναι που δίνει τη δύναμη
υποβολής κατά ένα μέρος, που κρύβεται στους πίνακές του. Χαρακτηριστικό
δείγμα αυτής της τεχνικής αποτελεί ο πίνακας του "Ιωάννης Βαπτιστής".
Χαρακτικά:
(Ντύρερ): Χαρακτικόν αντίτυπο ή εγχάραξη επί πλάκας μαλακού μετάλλου
(κυρίως χαλκού). Ο τεχνίτης χάραζε το σχέδιο με το καλέμι και
δημιουργούσεν επιφανειακές γραμμές που πάνω τους θα συγκρατιόταν το
μελάνι. Παρ' όλο που η διαδικασία ήτανε γραμμική, πετύχαιναν απόδοση
διαφόρων τόνων με τη προσθήκη παραλλήλων γραμμών σε μικρήν απόσταση
μεταξύ τους. Ο Ντύρερ ήτανε δεξιοτέχνης και τα χέρια του ανάδειξαν
αμέτρητες σκιάσεις κι ιδιαίτερα πλούσιαν υφή, όπως και σ' ένα πίνακα
ζωγραφικής. Αργότερα, η μέθοδος αυτή χρησιμοποιήθηκε κυρίως γι'
αναπαραγωγή ήδη υπαρχόντων πινάκων, παρά γι' αυτόνομα χαρακτικά.
Ακουαρέλα:
(υδατογραφία) Αφορά συγκεκριμένον είδος ζωγραφικής που τα τριμένα
χρώματα, διαλύονται σε νερό κι αναμιγνύονται με μια μικρή ποσότητα
στερεωτικού υλικού, όπως ήτανε τότε το αραβικό κόμμι. Τεχνική δημοφιλής
στους τοπιογράφους του 18ου αιώνα. Ο Ντύρερ ήτανε δεξιοτέχνης κι εδώ. Σε
μερικά έργα, χρησιμοποίησε ακουαρέλα για ν' απλώσει χρώμα στα σχήματα
που 'χεν ήδη δημιουργήσει με μελάνι, ενώ σ' άλλα τη διαχειρίστηκε πιο
ελεύθερα. Τα χρώματα της υδατογραφίας πρέπει να 'ναι διάφανα, για να
διακρίνεται το χαρτί, κάτω από τη ζωγραφικήν επιφάνεια, στοιχείο που
βοηθά στη δημιουργία λεπτών αποχρώσεων και την επιτυχημένην απόδοση των
ατμοσφαιρικών συνθηκών. Τα χρώματα όμως μπορούν να χρησιμοποιηθούν κι ως
επικαλυπτικά (γκουάς), με προσθήκη κιμωλίας ή άλλων ουσιών, στις
χρωστικές. Ο Ντύρερ, συχνά εφάρμοσε κι υδατογραφία και γκουάς στο ίδιο
έργο, όπως π. χ. στον "Λαγό" και τη "Νεκρή Φύση" ("Χλόη"), που υπάρχουνε στο Στέκι κι είναι από τα καλύτερα του είδους.
Ξυλογραφίες:
Τεχνική εκτύπωσης απ' ανάγλυφην επιφάνεια, που κατάγεται από τη Κίνα,
του 5ου αιώνα κι εισήχθη στην Ευρώπη τον 14ο. Στην εποχή του Ντύρερ,
έγινεν η προσφιλέστερη μέθοδος εικονογράφησης βιβλίων αλλά και
μεμονωμένων χαρακτικών. Ο τεχνίτης παίρνει ένα κομμάτι μαλακού ξύλου και
με σκαρπέλο, χαράζει το σχέδιο, αφαιρώντας κομμάτια εκεί, όπου το
σχέδιο της στάμπας, θα παραμείνει λευκό κι αφήνωντας ανάγλυφα τα σημεία,
όπου θα 'παιρναν χρώμα για τη στάμπα. Ο Ντύρερ υπήρξε πρωτοπόριακός, ως
προς τις διαστάσεις, την ολοκληρωμένη σύνθεση και τον ζωγραφικό πλούτο.
Ζωγραφική Σε Σμάλτο: (Stubbs):
Πάντα δοκίμαζε νέες τεχνικές κι άρχισε να ζωγραφίζει πάνω στο σμάλτο,
το 1770. Στην αρχή χρησιμοποίησε ως ζωγραφικήν επιφάνεια, οκταγωνικές
χάλκινες πλάκες.
Καπρίτσια: ή fancy pictures (Reignolds, Gainsborough):
ήταν πίνακες με μαγική συναισθηματικήν ατμόσφαιρα που δε λείπαν οι
διάφορες μορφές και κυρίως αυτές ήτανε μικρά παιδιά. Λένε πως ο
Ρέινολντς ζωγράφιζε τέτοιους πίνακες, στο διάλειμμά του ή μεταξύ δυο
πορτρέτων.
http://web.archive.org/web/20071214193651/http://www.peri-grafis.com/ergo.php?id=1008
Χρήσιμες ιστοσελίδες:
YOUTUBE http://www.youtube.com/watch?v=GN0okOq8Hyc
INTERACTIVE http://www.pbs.org/parents/creativity/sensory/matisse.html
http://www.artbma.org/flash/f_conekids.swf ΤΕΛΕΙΟ
ΧΡΗΣΙΜΟ http://www.artforsmallhands.com/2010/06/in-style-of-henri-matisse.html
ΔΡΑΣΤΗΡΙΟΤΗΤΕΣ ΜΕ ΠΑΤΡΟΝ http://www.storyboardtoys.com/gallery/matisse-kids-art-lesson.htm
ΓΕΝΙΚΕΣ ΔΡΑΣΤΗΡΙΟΤΗΤΕΣ ΤΕΧΝΗΣ http://arts-humanities.squidoo.com/ideas-for-elementary-art-classes